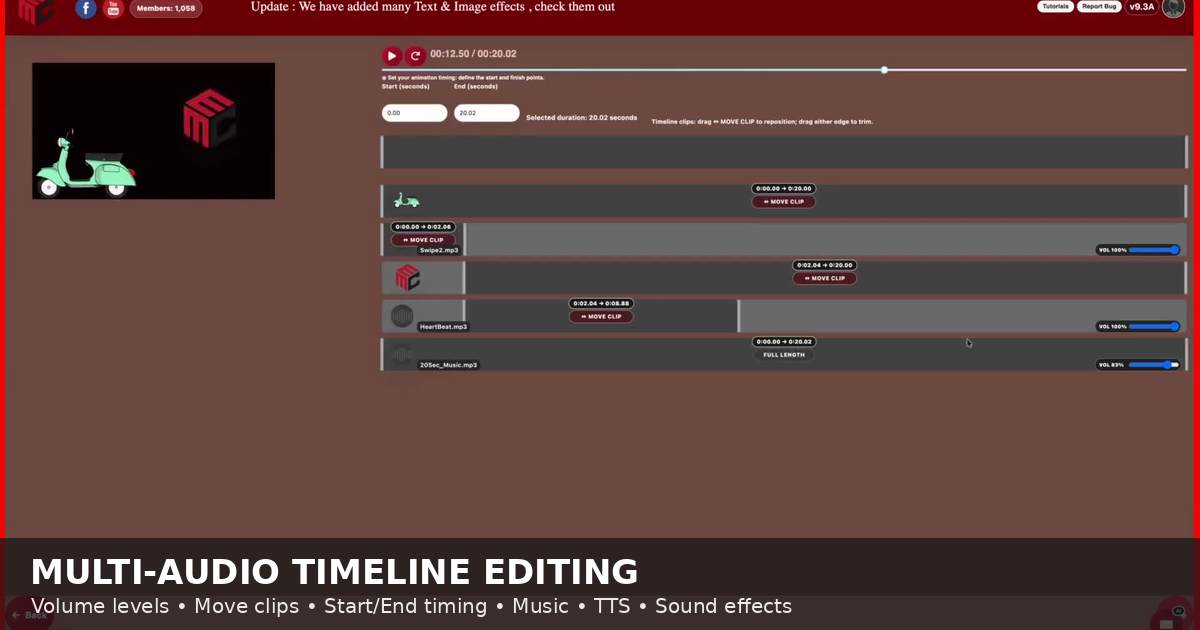
MyMirrorClub has grown into a much more capable animation workspace. You can now build a complete soundtrack inside one project using multiple audio tracks, individual volume levels, background music, narration, sound effects and precise Timeline positioning.
This guide walks through the real workflow shown in the tutorial below. The tutorial itself was created and published entirely inside the MyMirrorClub editor, making it a practical example of the same tools being demonstrated.
What this tutorial covers
- Creating a 1920 × 1080 animation project
- Adding visual animation effects
- Adding multiple audio tracks to one project
- Using narration, music and sound effects together
- Changing the volume of each Audio layer independently
- Dragging complete clips to new positions on the Timeline
- Trimming Start and End points with the existing handles
- Reading exact Start → End timing while editing
- Scrubbing to a new position and continuing playback from that point
- Publishing the final combined audio and video result
Build the visual animation first
The tutorial begins with a new 1920 × 1080 canvas. A motorcycle graphic is added and given a slide-style entrance so it moves into the design instead of simply appearing.
The canvas background is then adjusted, and a MyMirrorClub logo is added with a heartbeat-style animation effect. This creates two separate visual moments that can be matched with sound.
Add sound effects that match the animation
Visual motion becomes much more convincing when the sound happens at the right time. A slide sound effect is added for the motorcycle, and a heartbeat sound is added to support the animated logo.
Each sound becomes its own Audio layer, which means it can be positioned independently rather than being permanently attached to another layer.
Mix multiple audio tracks in one project
The editor can now combine several Audio layers in the same animation. A project can include:
- Text-to-speech narration
- Voice recordings
- Background music
- Short sound effects
- Additional sound clips later in the Timeline
- Embedded sound from video layers
This makes it possible to create a real soundtrack instead of being limited to one audio file.
Control the volume of every Audio layer
Different sounds should not all play at the same level. Narration may need to stay clear at 100%, while background music may work better at 20% or 30%.
Each Audio row includes its own VOL control. That lets you lower background music without reducing the volume of narration or an important effect.
The same level is used when the project is published, so the final mix follows the balance created in the editor.
Move a complete Audio clip without changing its duration
Timeline editing becomes much faster when you can move the whole clip instead of adjusting Start and End separately.
Grab ↔ MOVE CLIP in the center of a movable Timeline block and drag it left or right. The entire clip moves while its duration stays locked.
For example, a six-second sound can be moved from the beginning of a project to a later point without changing its six-second length.
Keep Start and End times visible
Each timed clip shows its exact Start → End position. The timing remains visible while the clip is being moved, making it easier to place sounds precisely.
The existing left and right handles still work independently, so you can trim the beginning or ending whenever a clip needs to be shorter.
Continue a short effect with another Audio clip
The tutorial demonstrates a practical example with the heartbeat sound. The first heartbeat clip is only a few seconds long, so another heartbeat clip is added after it and positioned later on the Timeline.
This lets you decide exactly where a repeated sound comes in instead of being forced to stretch one file across the entire project.
Use background music under narration and effects
Background music is added as another independent Audio layer. Because it has its own volume control, it can sit underneath louder narration and effects instead of competing with them.
A common combination is:
- Narration / TTS: 100%
- Background music: 15–30%
- Short sound effects: adjusted to fit the scene
The exact level depends on the audio files, but the important part is that every track can be balanced separately.
Scrub the player without fighting the playback clock
When you grab the player scrubber during playback, MyMirrorClub pauses the project. Move the playhead to the new position, release it, and the editor remains paused there.
Press Play again to continue from the exact point you selected. The same interaction is used in the main editor and the Timeline so the workflow stays consistent.
Smooth audio fade at the project ending
Instead of ending at full volume with an abrupt cut, the finished soundtrack can fade smoothly as the project reaches its active ending. This is especially useful when background music continues until the end of an animation.
The fade follows the actual trimmed project ending, so shortening the animation also moves the fade to the new end point.
Combine more than one video layer
Projects can also contain more than one video layer. Later videos follow their own Timeline Start and End positions, and embedded video audio can be included in the final soundtrack.
This makes it possible to build longer tutorials or presentations by combining different video sections with narration, music and effects.
The tutorial itself was edited in MyMirrorClub
One of the strongest parts of this demonstration is that the tutorial was not assembled in a separate desktop video editor. The screen recording, added audio, music, effects, Timeline placement and final published result were all brought together inside MyMirrorClub.
That real project became a stress test for multiple Audio layers, long media, Timeline movement, volume controls, trimming, later video clips and final publishing.
Useful workflow for tutorials, booth content and social media
These tools are useful beyond one type of project. You can use the same workflow for:
- Photo booth animation tutorials
- Mirror booth welcome and instruction videos
- Background music with voiceovers
- Event promos and social media clips
- Product walkthroughs
- Animated logos with synchronized sound effects
- Multi-part videos with different audio sections
Start creating in MyMirrorClub
Open the MyMirrorClub Editor to start a new project, browse the creative asset library, explore photo booth templates and photo booth animations, or create an account and try the workflow yourself.
With multiple Audio tracks, individual volume levels, complete Timeline clip movement, visible timing, trimming and smooth final fading, MyMirrorClub can now handle much more complete audio-and-video editing workflows directly in the browser.
FAQ: Can I add more than one Audio track?
Yes. You can combine narration, music, sound effects and additional Audio layers in the same animation project.
FAQ: Can each Audio layer have a different volume?
Yes. Each Audio Timeline row has its own volume control from 0% to 100%.
FAQ: Can I move an entire sound without changing its length?
Yes. Drag the center MOVE CLIP control to reposition the whole clip while keeping its duration unchanged.
FAQ: Can I still trim the beginning or ending?
Yes. The left and right Timeline handles remain available for adjusting Start and End independently.
FAQ: Does the published video keep the audio mix?
Yes. The final published result uses the Audio layers, their individual volume settings, their Timeline positions and the project-end fade.
FAQ: Can later video clips include their own sound?
Yes. Video layers with embedded audio can be used alongside separate Audio layers, and their sound is included in the published mix when the video is not muted.