Huge improvements are happening inside the MyMirrorClub Editor.
Smart alignment guides and multiple-layer selection are designed to help photo booth creators build complete layouts faster, easier and with far more precision—especially when starting from a blank canvas.
Creating a professional photo booth template is not only about choosing attractive graphics. Frames must line up, decorative images must sit in the correct place, and the gaps between repeated elements must feel consistent. Small positioning differences that are difficult to notice while editing can become obvious in the final design.
MyMirrorClub now provides a much stronger layout system directly inside the online editor. Blue smart guides help layers line up with the canvas and with one another. Gold equal-spacing guides help repeated layers sit at matching distances. Multiple-layer selection makes it possible to move, delete, copy, paste or duplicate an entire arrangement as one group.
MyMirrorClub is FREE TO TRY, and new accounts receive 1 free publishing credit on signup.
Why better alignment tools matter for photo booth layouts
Photo booth templates regularly use two, three or four photo openings. A design may also include logos, event names, decorative PNG graphics, Touch to Start artwork, borders and animation layers. When these elements are created from scratch, relying only on the canvas center is not enough.
The editor now compares the layer being moved with other visible layers. As the layer approaches a matching edge, center or spacing position, a temporary guide appears and the layer gently snaps into place. The guides are editor helpers only; they are not added to the published template or animation.
Blue smart alignment guides
Blue guides show that a layer is aligned with the canvas or with another layer. They can appear while moving text, uploaded images, decorative graphics, shapes, Border Frames and photo-frame layers.
The editor can detect matching:
- Left edges
- Horizontal centers
- Right edges
- Top edges
- Vertical centers
- Bottom edges
The original canvas-center guides remain available, but the editor is no longer limited to the center of the complete canvas. A moving layer can now align directly with another layer anywhere in the project.
Center an image inside a frame
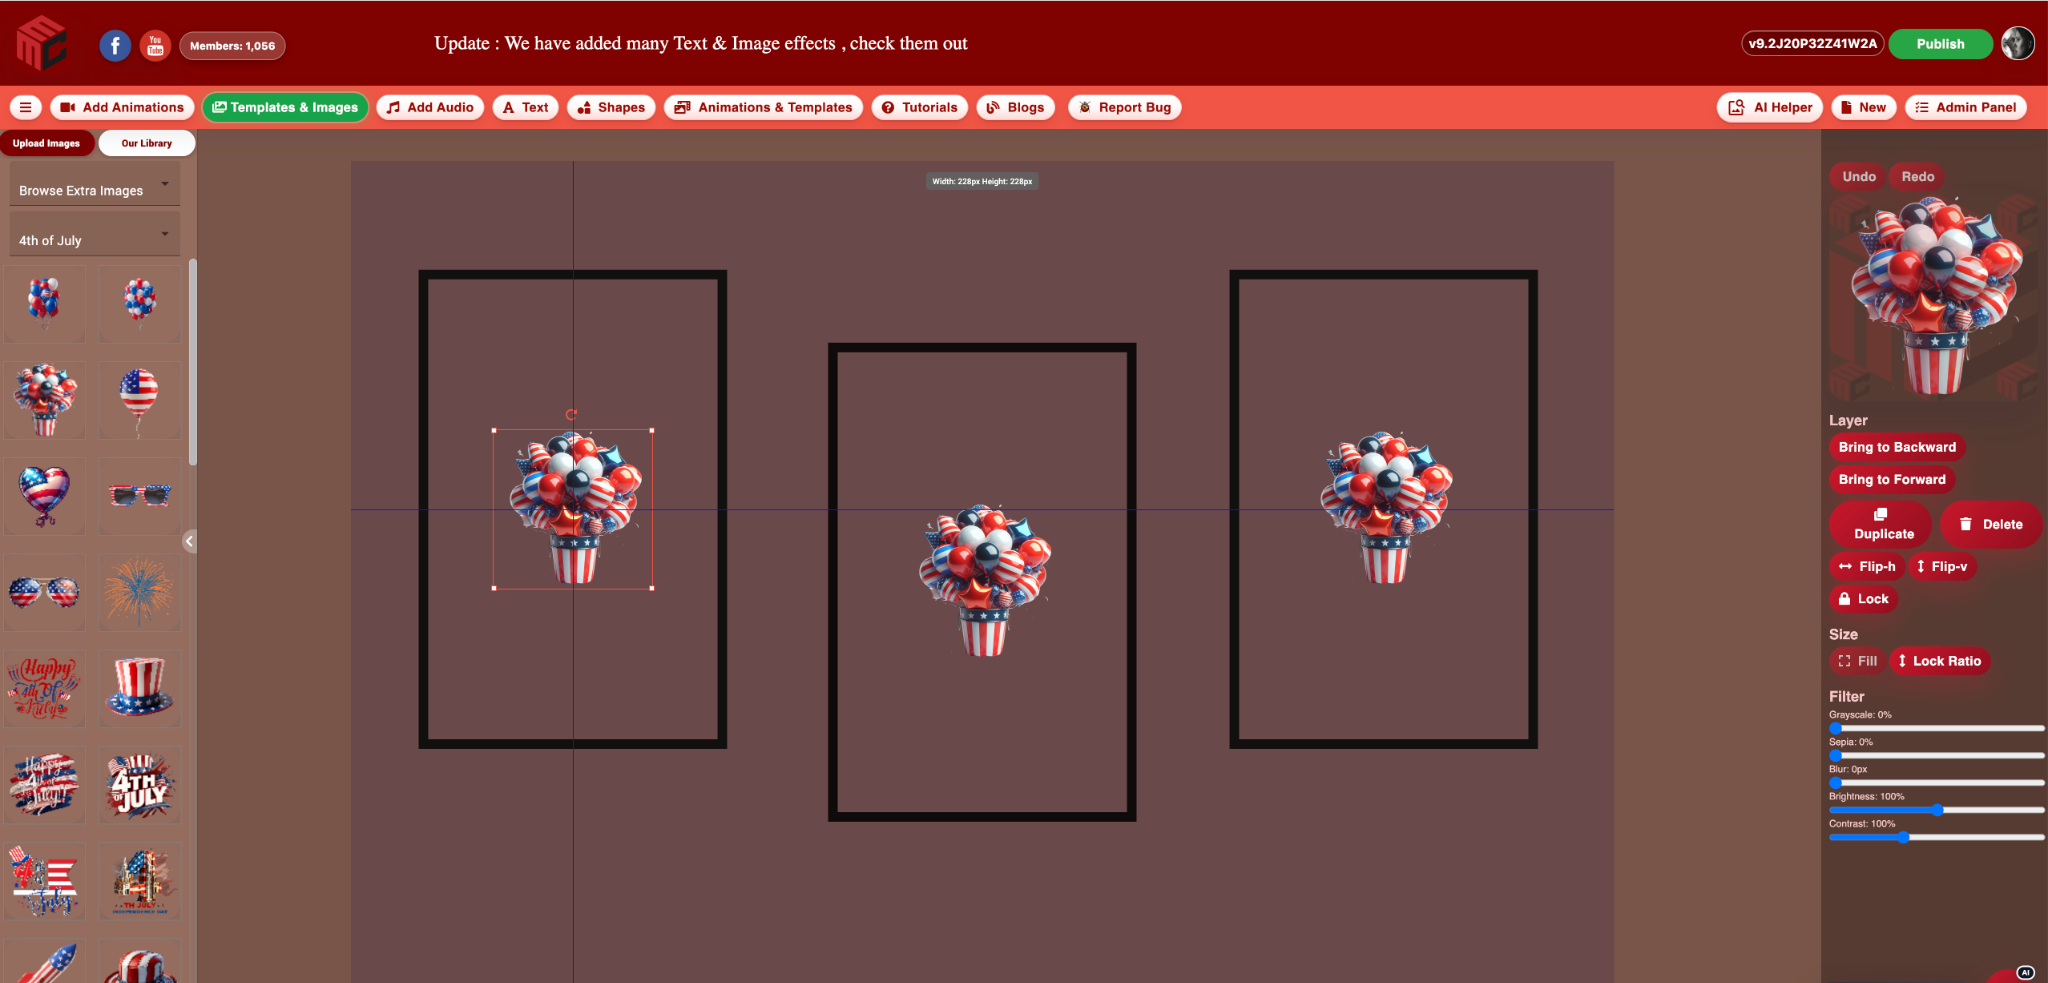
One of the most useful examples is placing a decorative graphic directly in the middle of a photo frame. As the image reaches the frame's horizontal and vertical center, the blue guides cross through both layers. This gives the creator a clear visual confirmation that the image is centered inside that specific frame rather than merely centered on the overall canvas.
This same behavior is useful for:
- placing a logo in the middle of a photo opening;
- centering a Touch to Start graphic inside a bordered area;
- matching the center of text with the center of a shape;
- lining up decorative images with several photo frames;
- aligning an image, text layer or shape with another layer that is not at the center of the canvas.
Gold equal-spacing guides
Alignment and spacing are two different jobs. Blue guides tell you that edges or centers match. Gold guides tell you that the empty spaces between repeated layers are equal.
When three layers form a row or column, the editor compares the gaps around the moving layer. As soon as both gaps match, the layer snaps into the evenly spaced position and two gold indicators appear—one in each matching gap.
Equal spacing between decorative images
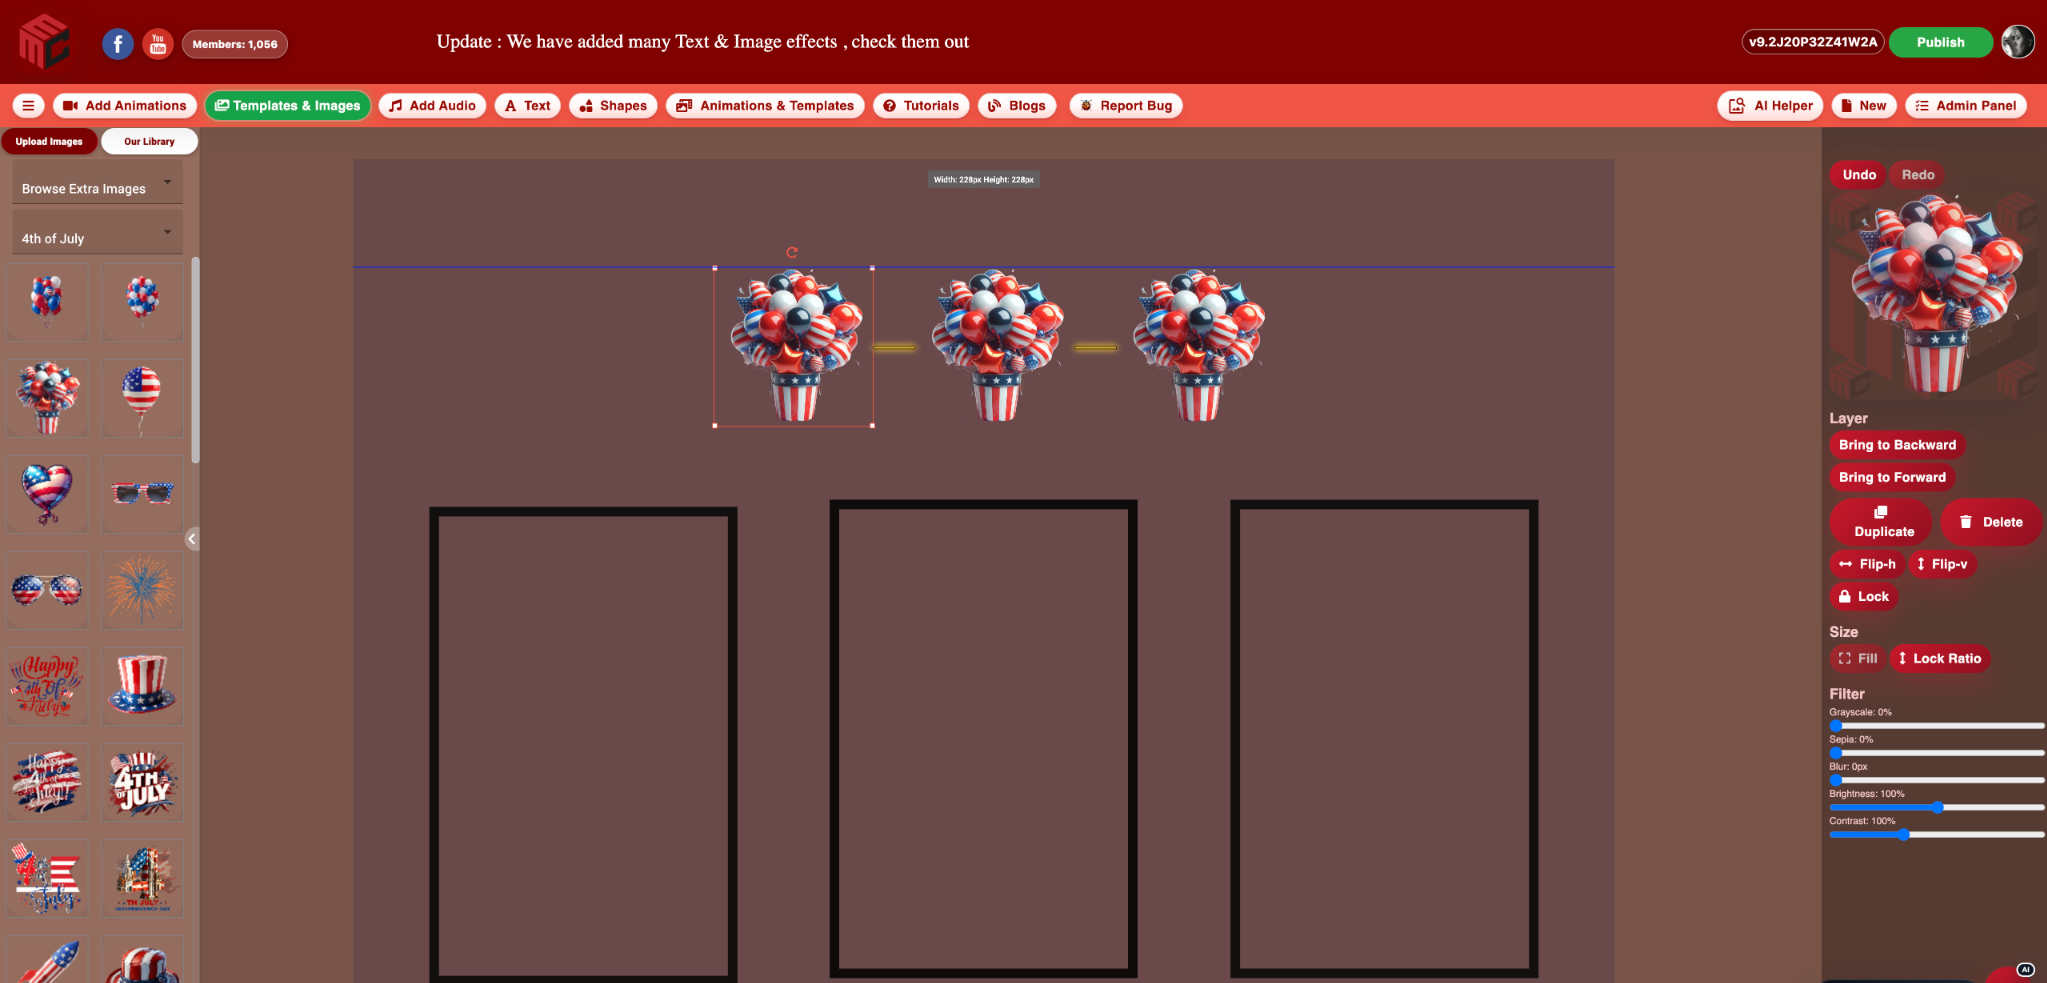
The gold guide system is not limited to frames. In the example below, three decorative balloon images have matching top alignment and equal horizontal gaps. The blue line confirms their shared top position, while the gold marks confirm that the space from the first image to the second matches the space from the second image to the third.
Equal spacing between photo frames
Photo frames are where equal spacing becomes especially important. Uneven gaps can make an otherwise good layout look unbalanced. The editor now helps place the middle frame so the left and right spaces match without requiring manual measurement.
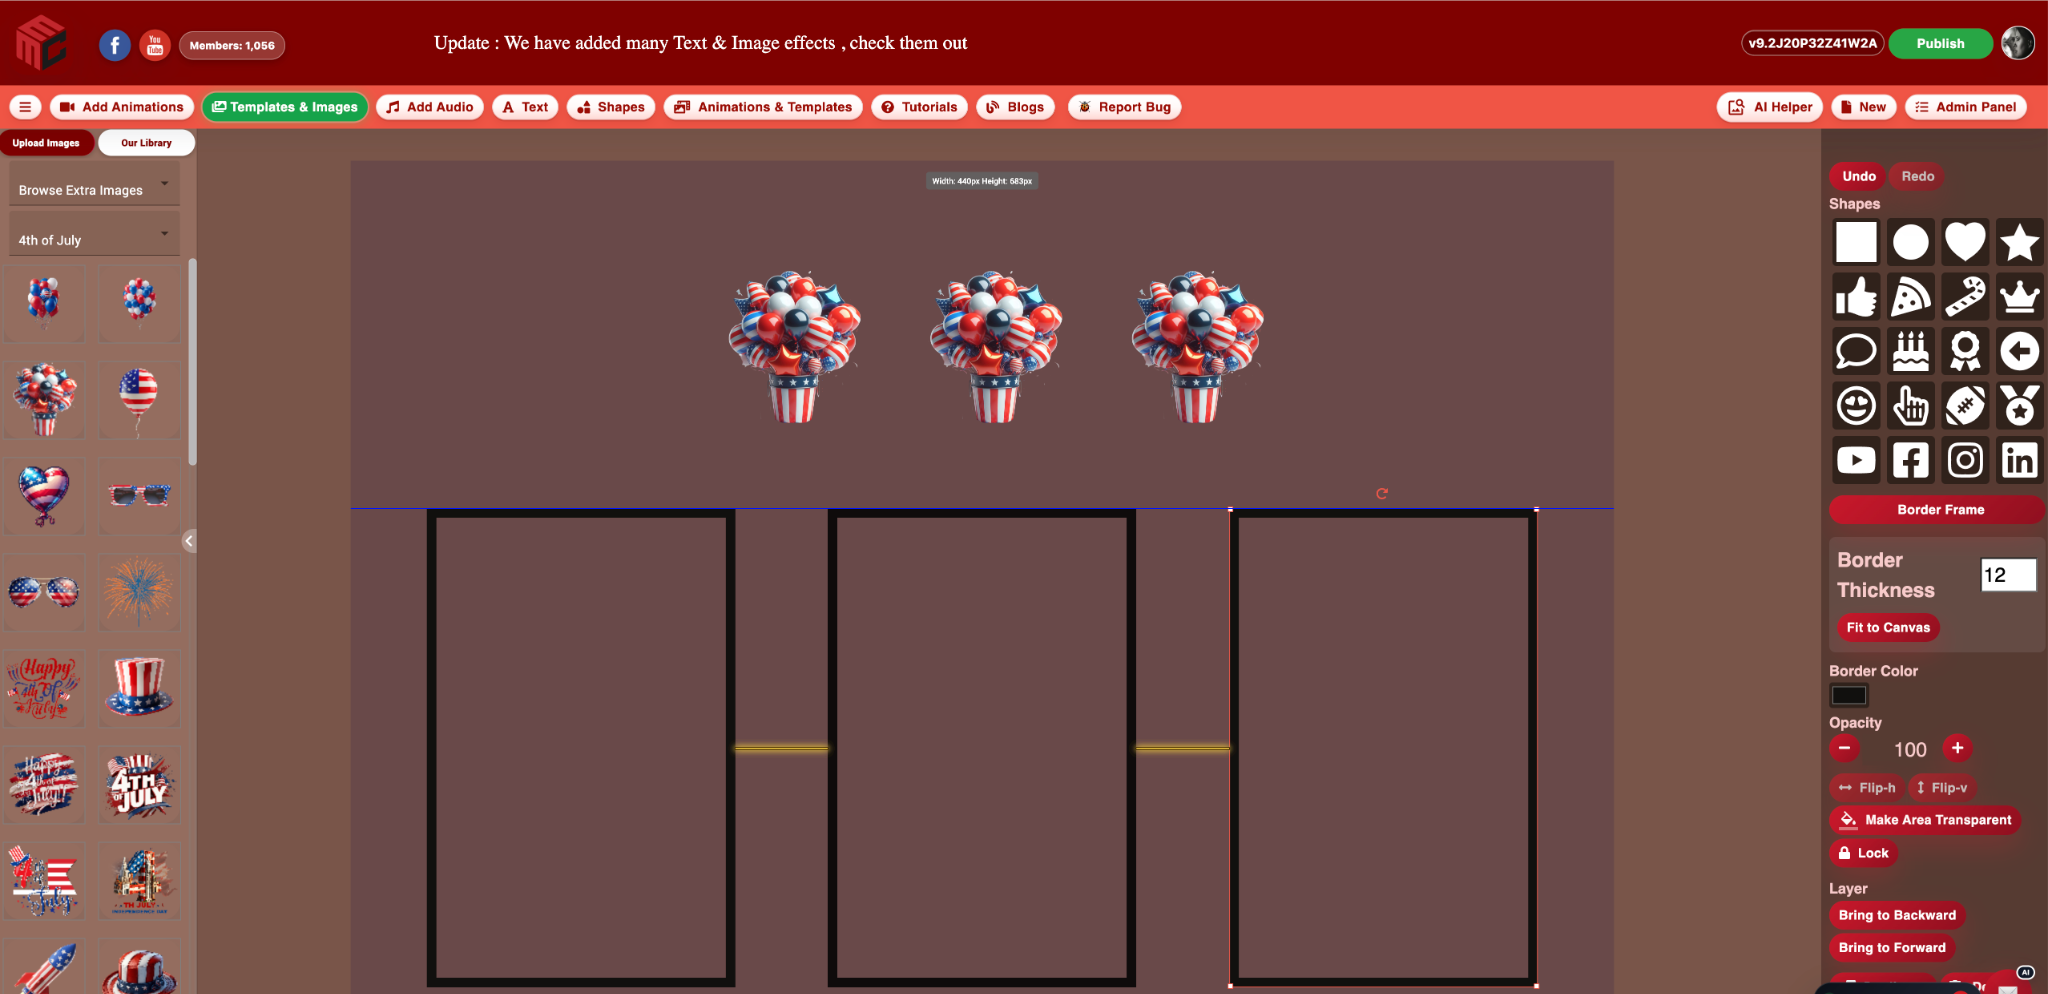
Gold spacing guides can also work vertically when layers are arranged in a column. This is useful for stacked photo layouts, vertical button groups, text blocks and repeated decorative elements.
Blue and gold guides work together
The two guide colors communicate different information:
| Guide | Meaning | Typical use |
|---|---|---|
| Blue | Edges or centers are aligned | Matching tops, bottoms, sides or centers |
| Gold | The gaps between layers are equal | Evenly spacing frames, images, text or shapes |
A row of three frames can therefore show a blue line for matching top edges and gold marks for matching gaps at the same time. This is much faster than repeatedly moving each frame and judging the result by eye.
Multiple-layer selection
Precise placement is only part of the workflow. Once several layers form a finished arrangement, creators often need to move the complete arrangement without disturbing the spacing. MyMirrorClub now supports selecting several layers together.
How to select multiple layers
- Click the first layer normally.
- Hold Shift on Mac or PC.
- While continuing to hold Shift, click each additional layer that should join the selection.
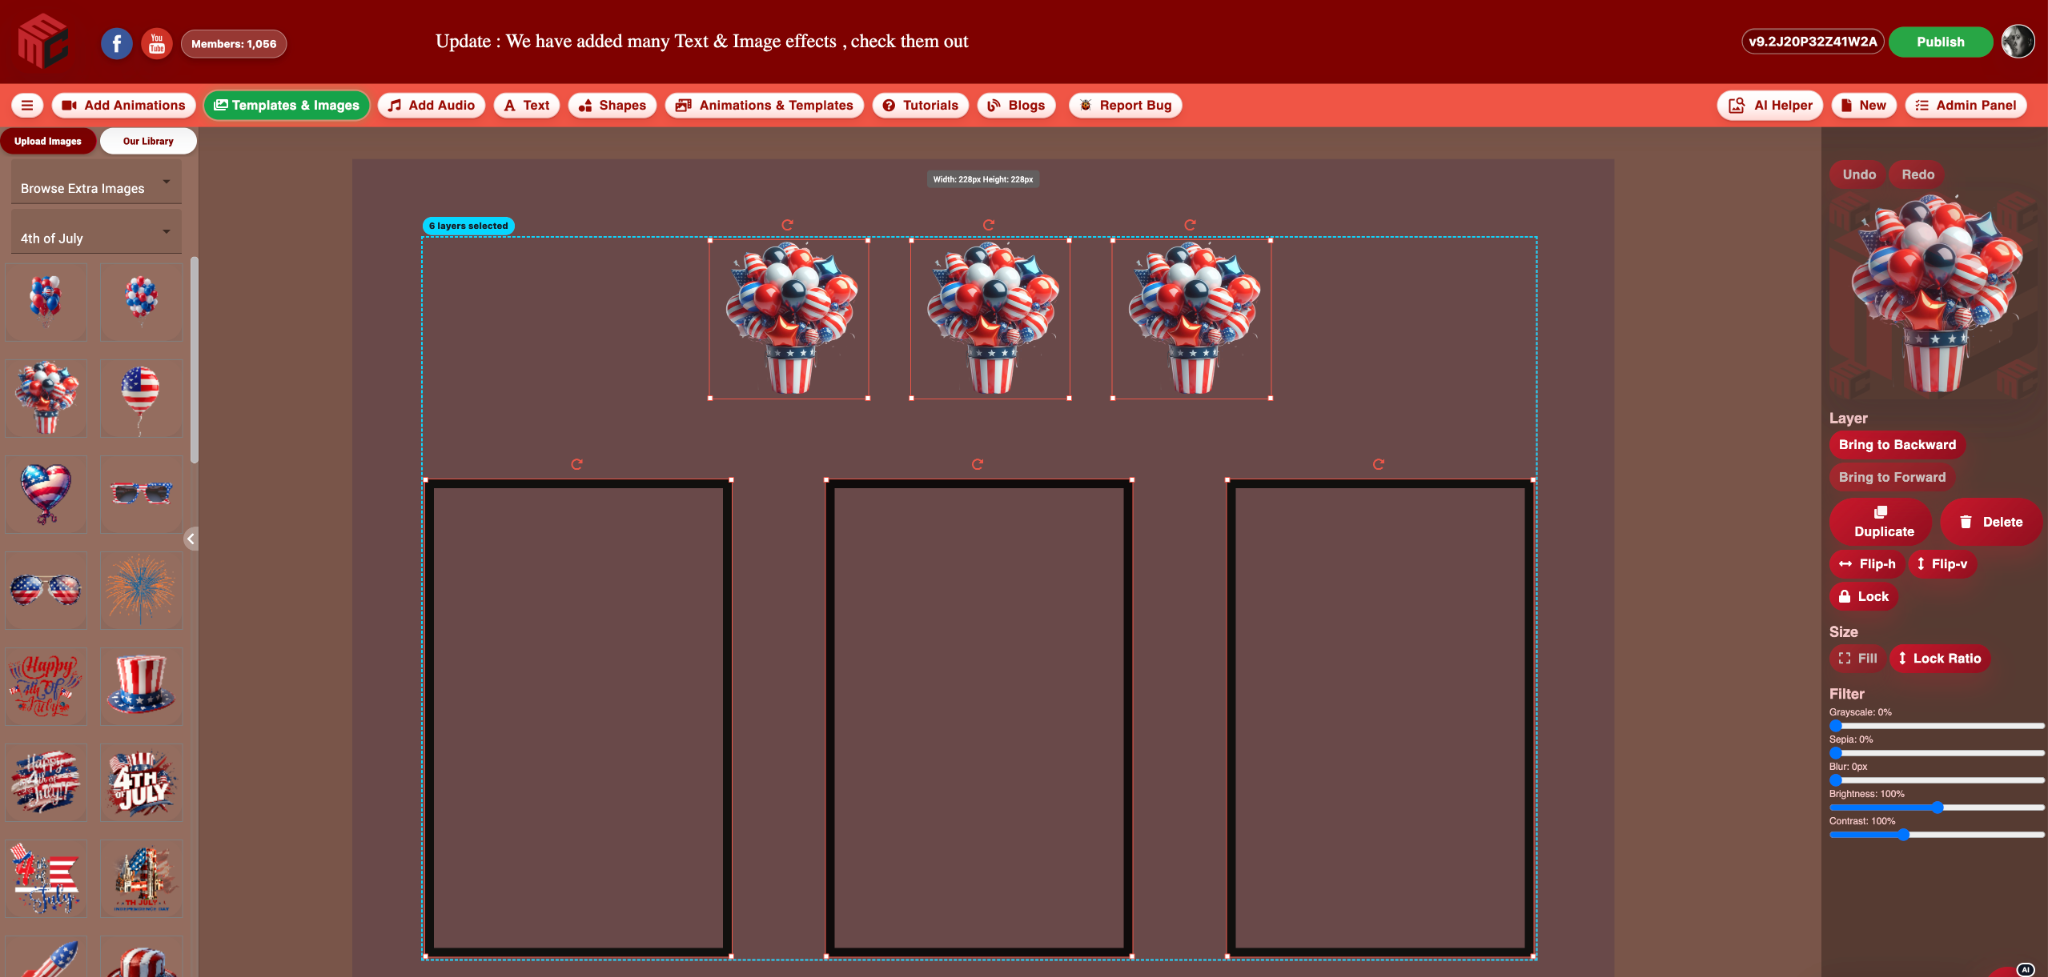
- A cyan dashed boundary appears around the complete selected area, along with a count showing how many layers are selected.
Shift-clicking an already selected layer removes it from the selection. Clicking another layer without Shift returns to normal single-layer selection.
The selection system supports text, uploaded images, decorative images, photo frames, Rectangle/Square shapes, Border Frames and mixed combinations of these layers.
Move a complete layout as one group
After several layers are selected, drag any selected member. The complete selection moves together while preserving the distance between every selected layer.
This is particularly useful after building a three-photo layout:
- align the three frames;
- use the gold guides to make their gaps equal;
- place matching decorations above the frames;
- Shift-click all six layers;
- move the finished arrangement to a new part of the canvas without rebuilding it.
Arrow keys can also nudge the complete selected group for small position adjustments.
Delete several layers at once
Multiple selection also makes cleanup faster. Select all unwanted layers and press Delete or Backspace. Every selected layer is removed together instead of requiring one deletion at a time.
This is useful when testing different decorations, replacing an entire photo-frame arrangement, clearing one section of a design or removing a copied group that is no longer needed.
Copy, paste and duplicate complete groups
The existing layer keyboard shortcuts now work with multiple selections. The relative positions inside the selection are preserved when the group is copied or duplicated.
| Group action | PC / Windows | Mac |
|---|---|---|
| Delete selected layers | Delete or Backspace | Delete or Backspace |
| Copy selected group | Ctrl + C | Command + C |
| Paste copied group | Ctrl + V | Command + V |
| Quick duplicate group | Ctrl + D | Command + D |
| Nudge selected group | Arrow keys | Arrow keys |
Pasted and duplicated groups appear slightly down and to the right of the original arrangement. This small offset makes the new copy easy to identify and move.
Text-editing safety remains protected
A text layer can participate in a multiple selection when it is selected normally. When the user activates the text itself for typing, layer shortcuts are blocked so normal text editing does not accidentally delete, duplicate or move design layers.
The same protection applies while using input fields, number controls, search boxes, selectors and other editable controls in the editor.
What multiple selection currently changes
Multiple selection is focused on group workflow. Selected layers can be moved, nudged, deleted, copied, pasted and duplicated together. The right-side property panel still follows the primary selected layer, so settings such as color are not yet applied automatically to every selected layer.
This separation protects layer-specific settings while still removing the most repetitive positioning and cleanup work.
A faster workflow for building a three-photo layout from scratch
- Add three Rectangle/Square shapes and convert them to Border Frames, or add the required photo-frame layers.
- Resize the frames to the desired photo dimensions.
- Move the frames until the blue guide confirms matching top edges.
- Move the middle or outside frame until two gold indicators confirm equal horizontal spacing.
- Add decorative images and use blue center guides to position each image relative to its matching frame.
- Shift-click the three frames and three decorations.
- Move the entire six-layer arrangement as one group.
- Use Command/Ctrl + D to create another complete copy when the design needs a repeated section.
- Use Delete or Backspace to remove the complete group during cleanup.
The result is a layout that can be created more quickly and adjusted with much more confidence.
Professional precision without complicated controls
These tools are designed to appear only when they are useful. Creators do not need to open a separate measurement window or type exact coordinates for every layer. Move a layer normally and the editor provides visual help at the moment alignment or equal spacing is reached.
That makes the workflow suitable for beginners while also giving experienced photo booth designers the speed and precision needed for high-volume template production.
Create faster in MyMirrorClub
Use smart guides to align frames, text, shapes and images. Use gold spacing guides to build balanced rows and columns. Then select the complete arrangement and move, delete, copy or duplicate it as one group.
Frequently asked questions
What do the blue guide lines mean?
Blue lines show that an edge or center of the moving layer matches the canvas or another visible layer.
What do the gold guide marks mean?
Gold marks show that the gaps between three layers are equal. Two gold indicators appear so both matching spaces are visible.
Do alignment guides appear in the published design?
No. Blue and gold guides are temporary editor helpers and are not included in the published template, MP4 or transparent MOV.
Can an image align with the center of a frame?
Yes. The editor can compare different layer types, allowing an image, logo, text layer or shape to align with a frame's horizontal or vertical center.
How do I select multiple layers on an iMac or Mac?
Click the first layer, hold Shift, and click each additional layer. The same Shift-click method works on PC.
Can I select frames and images together?
Yes. Multiple selection supports frames, Border Frames, images, text, shapes and mixed selections.
Can I delete several selected layers at once?
Yes. Press Delete or Backspace after selecting the layers.
Can I copy or duplicate a complete group?
Yes. Use Ctrl or Command with C, V or D. The group keeps its internal layout and the new copy receives a small position offset.
Can I change the color of every selected layer at once?
Not in this release. Group selection currently handles movement, nudging, deletion, copy, paste and duplication. The property panel continues to edit the primary selected layer.
Can I try the editor before buying credits?
Yes. MyMirrorClub is FREE TO TRY, and every new account receives 1 free publishing credit on signup.